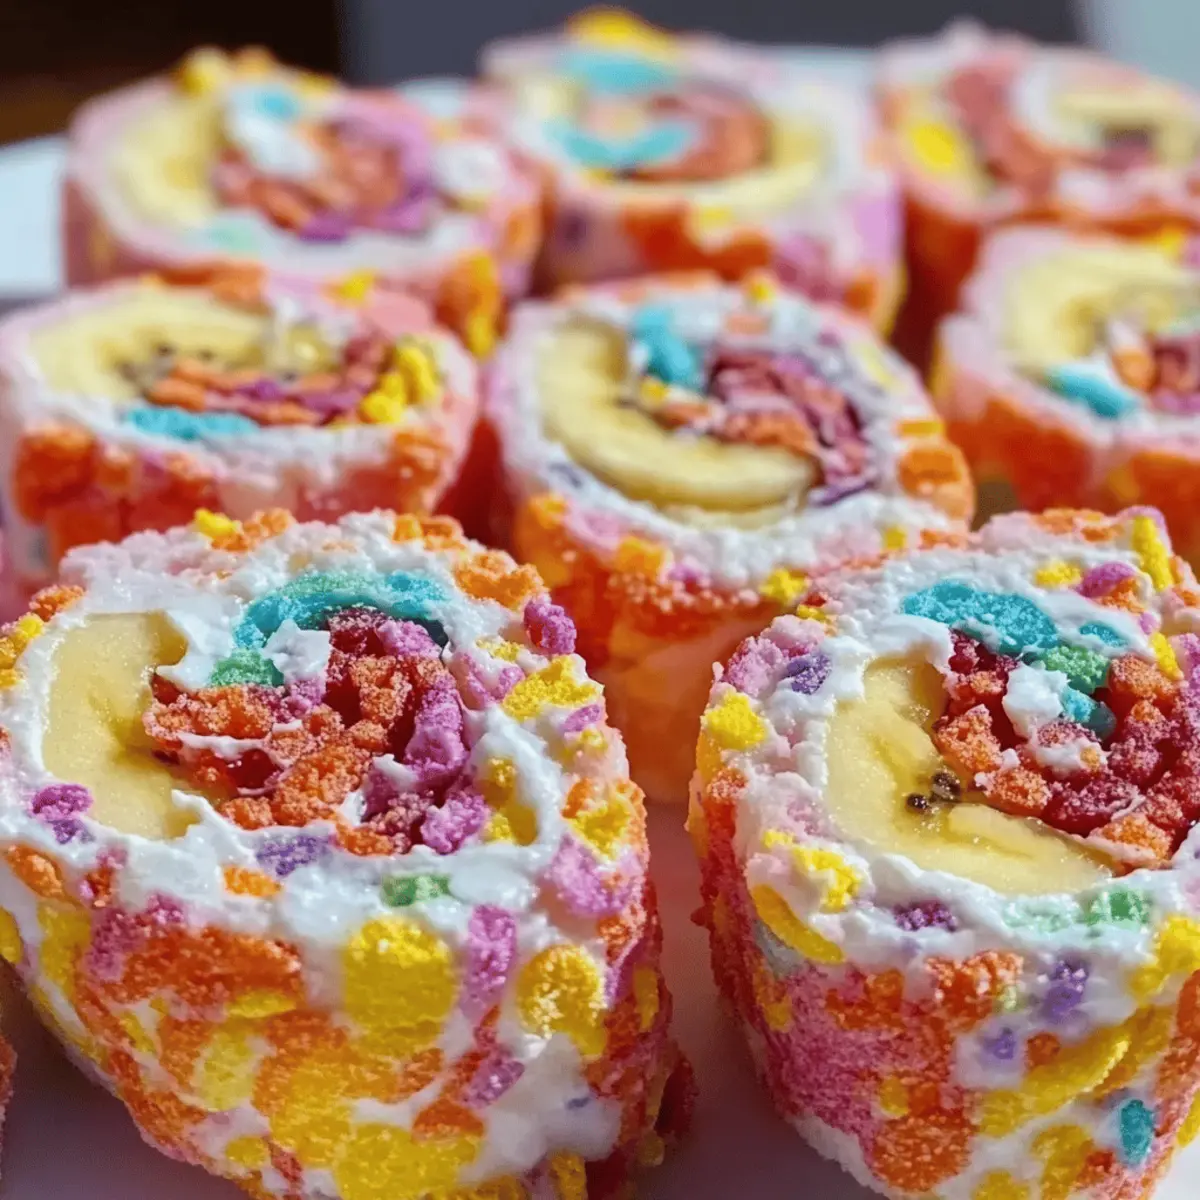
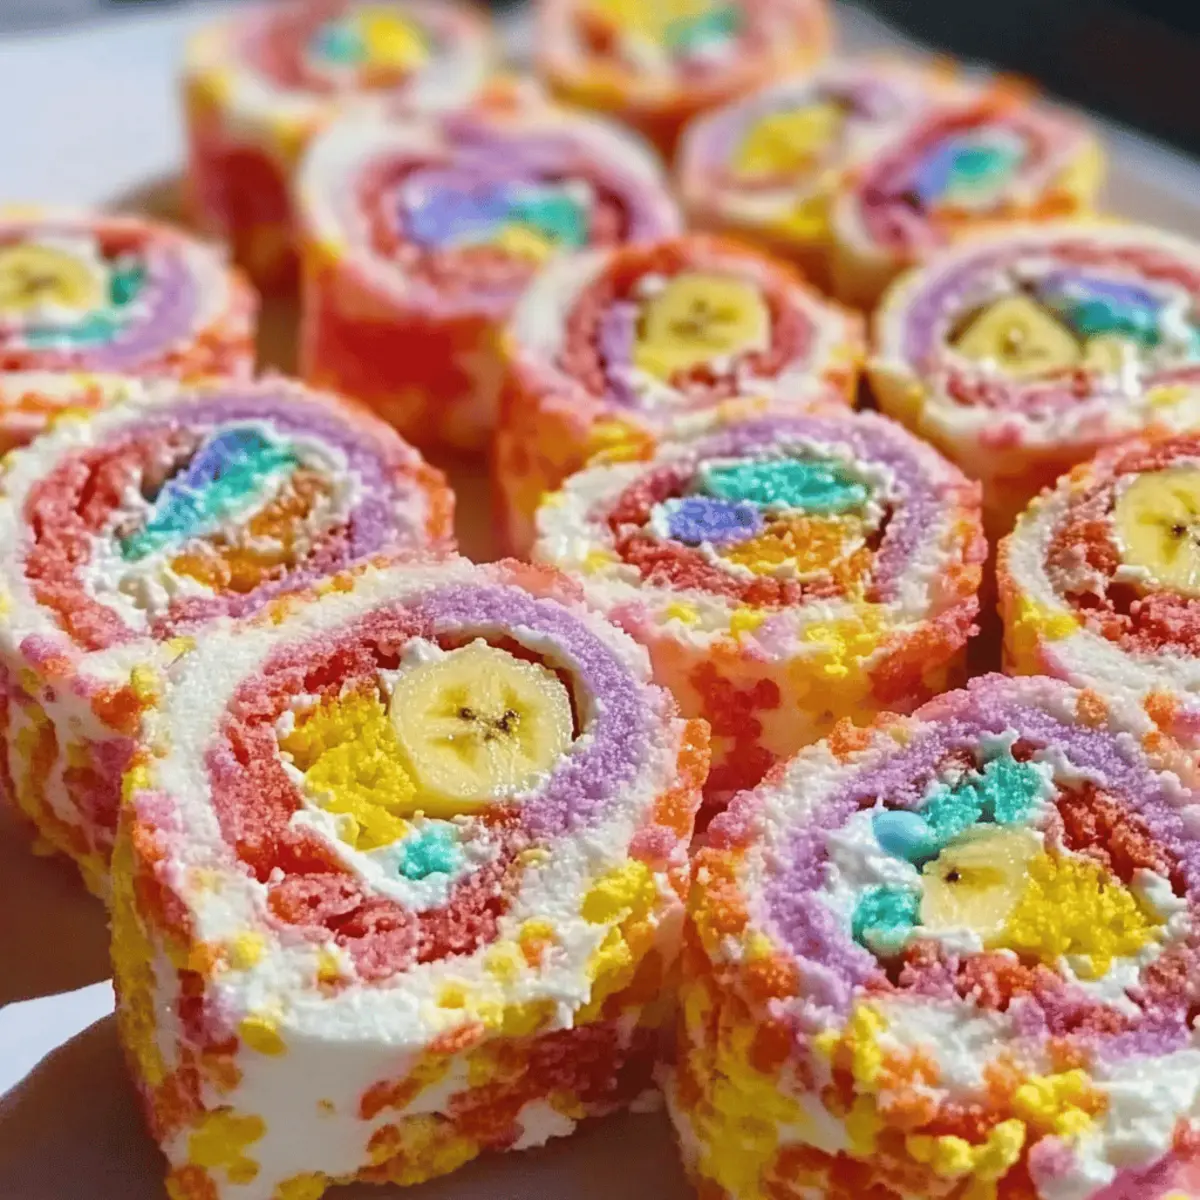
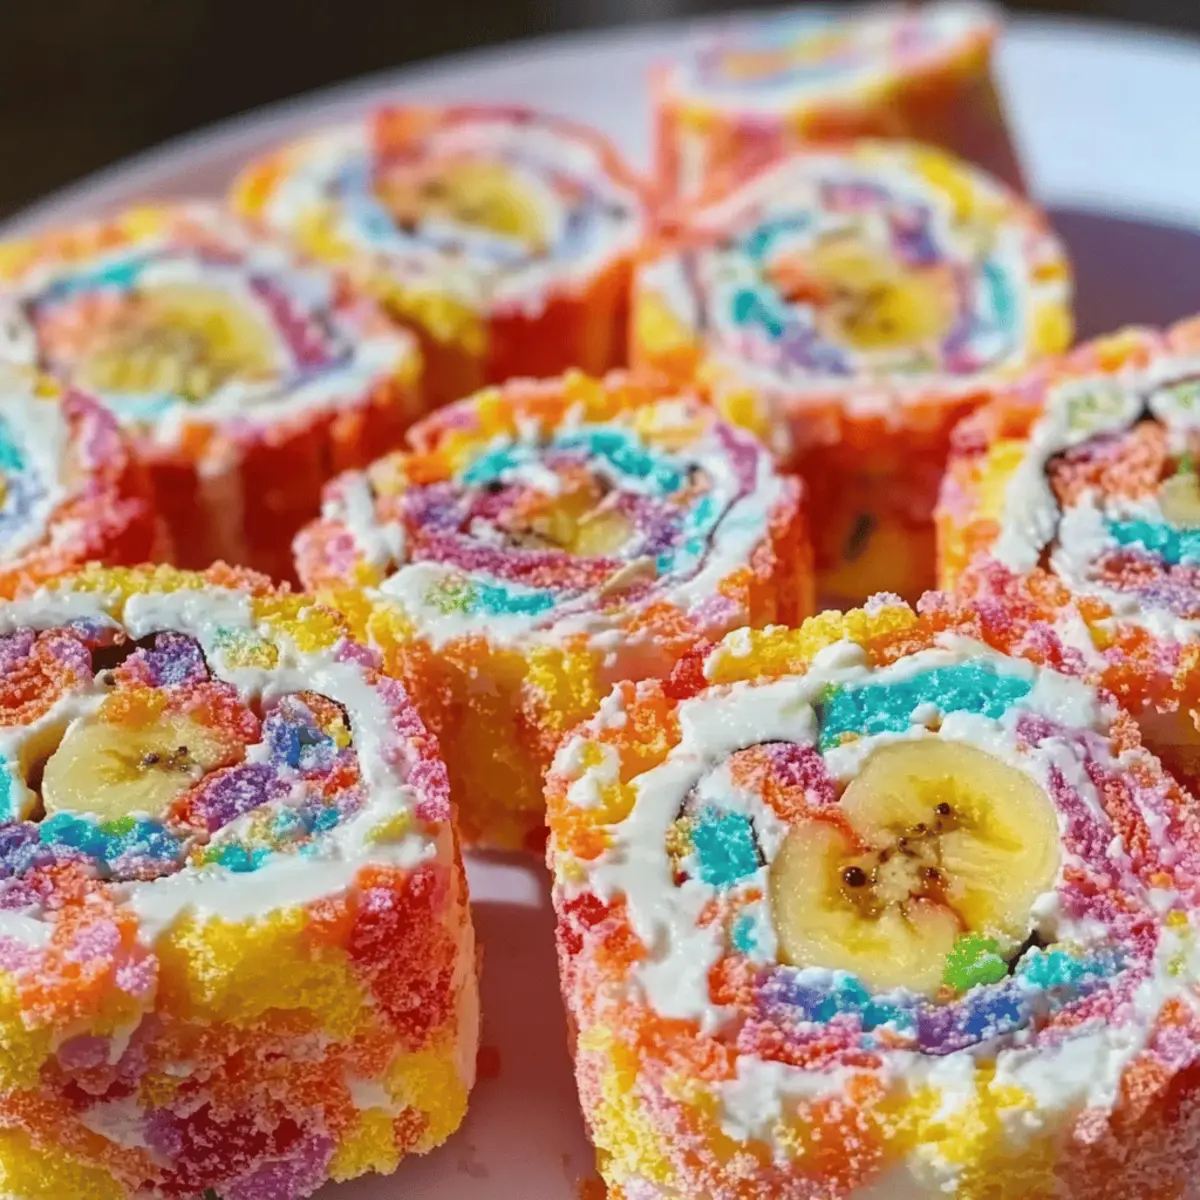
Who knew sushi could take a sweet turn? When I first set out to craft a dessert that combined the playful spirit of my childhood with a modern twist, Fruity Pebbles Sushi quickly became my go-to. This fun dessert is a colorful explosion of textures and flavors, making it the perfect treat for any gathering or family time. With its quick prep and vibrant presentation, it stands out as a creative way to satisfy your sweet tooth while reliving those joyous memories. Not only does it appeal to the kids, but I can assure you that adults will be just as enchanted! Ready to roll? Let’s dive into making this delightful Fruity Pebbles Sushi together, and I promise you’ll be left craving more.

Why is Fruity Pebbles Sushi a Must-Try?
Childhood Nostalgia: This whimsical dessert takes you back to joyful days with its bright colors and fruity flavors, making it an instant favorite.
Quick and Easy: With simple steps and easy-to-find ingredients, you’ll whip this up in no time, making it a hassle-free treat for any occasion.
Visual Appeal: Its vibrant presentation is not only eye-catching but also guarantees a friendly photo op, perfect for sharing on social media!
Versatile and Customizable: Feel free to swap in your favorite fruits or cereals, such as those featured in my delightful Fruity Indulgence Blissful recipe!
Bring everyone together with this playful sushi that appeals to both kids and adults alike; it’s sure to be a hit at your next gathering.
Fruity Pebbles Sushi Ingredients
• Create a colorful dessert with these simple elements!
For the Sushi Rice
- Sushi Rice – The base of the sushi, providing texture; opt for short-grain sushi rice for that perfect stickiness.
- Water – Essential for cooking the rice to achieve the right consistency.
- Sugar – Sweetens the rice; for a different flavor, try substituting with honey!
- Rice Vinegar – Balances the sweetness with a tangy note, enhancing the overall flavor.
For the Filling
- Fruity Pebbles Cereal – Adds a delightful crunch and vivid colors; alternatively, use Cocoa Pebbles for a chocolate twist.
- Cream Cheese – Brings creaminess to the roll and acts as a binding agent for the ingredients.
- Banana – Freshness for sweetness and moisture; feel free to swap with fruits like mango or kiwi.
- Strawberries – Offer added flavor and sweetness; any seasonal fruit makes a great substitute!
For the Presentation
- Chocolate Syrup – Optional drizzle for extra sweetness and a beautiful finishing touch.
Step‑by‑Step Instructions for Fruity Pebbles Sushi
Step 1: Prepare Sushi Rice
Rinse 2 cups of sushi rice under cold running water until the water is clear, which removes excess starch. Combine the rinsed rice with 2 ½ cups of fresh water in a medium saucepan. Bring to a boil over high heat, then reduce the heat to low, cover, and simmer for 20 minutes. Once finished cooking, turn off the heat and let the rice sit, covered, for an additional 10 minutes.
Step 2: Season Rice
In a separate small bowl, mix together ¼ cup of sugar and ¼ cup of rice vinegar until the sugar dissolves completely. Once the sushi rice has rested, transfer it to a large bowl and fold in the sugar-vinegar mixture gently while the rice is still warm. This will season the rice, giving your Fruity Pebbles Sushi the perfect sweet and tangy base.
Step 3: Slice Fruits
Start preparing your filling by slicing one banana into thin rounds and cutting strawberries into small pieces. Set these fruit slices aside on a clean cutting board. The freshness and sweetness of these fruits will complement the colorful Fruity Pebbles and add delightful textures to your sushi rolls.
Step 4: Assemble Sushi
Lay a bamboo mat on your workspace and cover it with plastic wrap to prevent sticking. With wet hands, spread an even layer of the seasoned sushi rice over the mat, leaving about an inch at the top uncovered. Sprinkle ½ cup of Fruity Pebbles evenly over the rice, then add lines of cream cheese, banana slices, and strawberry pieces right in the center.
Step 5: Roll Sushi
Using the bamboo mat, start rolling the sushi away from you, applying gentle pressure to form a tight roll while being careful not to squeeze the filling out. Moisten the uncovered edge of the rice with a little water to help seal the roll securely. Continue rolling until you have a complete cylinder of Fruity Pebbles Sushi.
Step 6: Slice and Serve
With a sharp knife, slice the rolled sushi into bite-sized pieces, about an inch thick, for easy serving. If desired, drizzle chocolate syrup over the slices for an extra touch of sweetness and visual appeal. Present your colorful Fruity Pebbles Sushi immediately to enjoy the delightful textures and vibrant flavors!

Make Ahead Options
Fruity Pebbles Sushi is perfect for meal prep, allowing you to save time on busy days! You can prepare the sushi rice and fruit fillings up to 24 hours in advance. Simply cook the sushi rice and season it, then let it cool completely before refrigerating in an airtight container. For the fruit, slice the bananas and strawberries, but to maintain freshness, store them separately in the fridge and assemble just before serving. When you’re ready to roll, spread the prepped rice on your mat, add the Fruity Pebbles and cream cheese, and roll tightly. This way, you’re guaranteed a delightful dessert that’s just as vibrant and tasty with minimal effort!
Fruity Pebbles Sushi Variations
Feel free to let your creativity shine as you customize this delightful dessert to suit your taste!
-
Dairy-Free: Swap the cream cheese for a dairy-free alternative like cashew cream to keep it creamy and delicious.
-
Gluten-Free: Use gluten-free rice and cereals to accommodate dietary needs while still enjoying the fun.
-
Cocoa Delight: Exchange Fruity Pebbles for Cocoa Pebbles for a rich chocolatey twist that pairs beautifully with bananas and strawberries.
-
Tropical Vibes: Substitute bananas and strawberries for fresh mango and pineapple for a refreshing tropical flair.
-
Nutty Add-In: Sprinkle some crushed almonds or walnuts before rolling for an added crunch and nutty flavor contrast.
-
Spicy Kick: Drizzle a dash of chili powder or cayenne pepper over your fruit filling for an unexpected heat that complements the sweetness.
-
Chocolate Dipped: After slicing, dip each piece in melted dark or white chocolate for an indulgent finish.
-
Fruit Loops Version: Make a whimsical take by using Fruit Loops cereal instead, giving your sushi a fruity twist to its visuals.
You might also enjoy pairing these variations with complementary treats like the indulgent Fruity Indulgence Blissful or the playful Fruity Pebbles Cheesecake to create a colorful dessert spread that’s sure to impress your friends and family!
How to Store and Freeze Fruity Pebbles Sushi
Fridge: Store any leftover Fruity Pebbles Sushi in an airtight container in the refrigerator. It’s best enjoyed within 1 day for optimal freshness.
Freezer: For longer storage, you can freeze the unassembled sushi rice and filling separately for up to a month. This way, you’ll retain the best textures when you’re ready to assemble.
Assembling in Advance: If preparing for a gathering, you can pre-cook the sushi rice and chop the fillings in advance. Just roll the sushi shortly before serving to maintain that delightful crunch!
Reheating: If you have leftover sushi, avoid reheating as it’s best served cold. Instead, enjoy it straight from the fridge for the perfect refreshing treat!
What to Serve with Fruity Pebbles Sushi?
Looking to create a fun and colorful meal experience alongside your delightful sushi treat?
- Whipped Cream: A light and airy accompaniment that will enhance the fruity flavors; perfect for dipping!
- Fresh Fruit Salad: Bright, seasonal fruits mixed together create a refreshing, juicy contrast that’s easy to prepare and serve.
- Vanilla Ice Cream: Creamy, cool vanilla ice cream adds indulgence and matches the playful flavors of your sushi.
- Chocolate Drizzle: Elevate the sweetness; additional chocolate drizzled over the top can provide a decadent touch.
- Sparkling Fruit Juice: A bubbly, refreshing drink option; its effervescence complements the sweetness of the dessert perfectly.
- Rainbow Sprinkles: A sprinkle of joy to top off your sushi, enhancing both texture and appearance with every bite!
- Dairy-Free Coconut Yogurt: For a creamy and tropical take, this yogurt can be a fantastic dairy alternative to serve on the side.
- Mint Leaves: Fresh mint leaves add a cooling element and cleanse the palate, balancing the sweetness of the Fruit Pebbles.
- Popcorn: Sweet or salted popcorn for an unexpected textural contrast; its crunchiness can round out the experience beautifully.
- Mini Marshmallows: For extra nostalgia, serve alongside fluffy mini marshmallows; they bring a delightful chewiness and sweetness boost!
Expert Tips for Fruity Pebbles Sushi
- Sharp Knife: Use a sharp knife to cut the sushi roll for clean, even slices that display the vibrant colors inside beautifully.
- Tight Rolling: Apply gentle pressure while rolling to avoid squeezing ingredients out, ensuring a perfectly tight sushi roll that holds together well.
- Warm Rice: Season the sushi rice while it’s still slightly warm; this enhances the absorption of flavors, resulting in a tastier Fruity Pebbles Sushi.
- Creative Add-ins: Don’t hesitate to experiment with different fruits or even cereals to create your unique spins on this fun dessert!
- Proper Storage: Keep leftover sushi refrigerated in an airtight container, but remember it’s best enjoyed fresh for optimal texture and taste.

Fruity Pebbles Sushi Recipe FAQs
Which fruits are best for Fruity Pebbles Sushi?
Absolutely! The classic combination of banana and strawberries works beautifully, but feel free to get creative. Fruits like mango, kiwi, or even blueberries can also add delightful flavors and textures. The key is to use fresh, ripe fruits for the best results.
How long can I store leftover Fruity Pebbles Sushi?
For optimal freshness, it’s best to enjoy Fruity Pebbles Sushi within 1 day of making it. Store any leftovers in an airtight container in the fridge. After that, the texture may get a bit mushy as the rice absorbs moisture from the fruits.
Can I freeze Fruity Pebbles Sushi?
Yes, you can! To freeze, I recommend keeping the sushi rice and the fillings separate. You can freeze uncooked sushi rice and prepared fruits for up to 1 month. When you’re ready to assemble, thaw everything and roll the sushi fresh for the best texture.
What should I do if my sushi isn’t rolling tightly?
Very! If you’re having trouble achieving a tight roll, ensure you’re applying gentle yet consistent pressure while rolling. Also, make sure the rice is slightly warm and moist; this will help the rice stick together. If you’ve squeezed too hard and the filling is spilling out, simply unwrap and start again!
Can I make Fruity Pebbles Sushi vegan or gluten-free?
Certainly! To make it vegan, simply replace the cream cheese with a plant-based alternative, and ensure the sushi rice doesn’t include any animal-derived ingredients. For gluten-free, check that your rice vinegar and sugar are gluten-free certified, and use gluten-free alternatives for any other components if needed.
Can my pets eat Fruity Pebbles Sushi?
No, it’s important to keep this dessert away from pets. The sugar and certain fruits may not be suitable for them. If you’d like to treat them, consider safe fruits like apple slices or blueberries meant for pets!

Fruity Pebbles Sushi: A Colorful Sweet Treat to Relive Childhood
Ingredients
Equipment
Method
- Rinse sushi rice under cold running water until the water is clear. Combine rinsed rice with water in a saucepan, bring to boil, reduce heat, cover, and simmer for 20 minutes. Let sit for an additional 10 minutes.
- In a small bowl, mix sugar and rice vinegar until sugar dissolves. Fold into cooked rice while still warm.
- Slice banana into rounds and strawberries into small pieces. Set aside.
- On a bamboo mat covered with plastic wrap, spread an even layer of seasoned rice, leaving the top inch uncovered. Sprinkle Fruity Pebbles, cream cheese, banana, and strawberries in the center.
- Roll the sushi gently using the bamboo mat, applying pressure to form a tight roll. Moisten the top edge to seal the roll.
- Slice the roll into bite-sized pieces and drizzle with chocolate syrup if desired. Serve immediately.

Leave a Reply